Other SparcBook information
Hacking the SPARCbook V1.1-2000.05.10
(List of Seldomly Asked Questions)
Copyright (C) 2000 by Ray Arachelian, All Rights Reserved .
Mirroring/Duplication of this web page and its related images is permitted so long they are not modified, or separated in any way. You may not link to
the images by themselves, nor distribute the images by themselves.
The original canonical copy of this SAQ can be found at http://www.sunder.net/SPARCbook
WARNING:
These instructions and information are provided AS IS, no attempt is made to verify corectness or suitability for any purpose. You may use this AT YOUR OWN RISK.
The author of this page takes absolutely NO RESPONSABILITY for any harm that may come to you, your property, your data, or anything else arising from the use of this
information (nor from any typos, spelling errors, or brain failures). If you void your warranty, damage your SPARCbook, electrocute / poison / hurt yourself or your cat, wesel, ferret, parakeet, spouse, freinds, enemies, etc, or die of boredom, that's your own damned fault. Don't come
crying to me about it. I won't care, nor will I pay for it. If you don't like this, don't read this SAQ. Go sue some other sucker. Take the usual precautions to static electricity, dust, a nearby opened can of Coke, Y2K bugs, falling metors or other hazzards. :)
LEGAL NOTICE:
The author of this SAQ list acknowledges that companies do exist and that they make products, and that the names of said companies and their
products are trademarks, service marks, and some are registered trademarks. The author further urges you to visualize the TradeMark, ServiceMark, and Registered Trade Mark
symbols wherever a company, product, logo or service being registered as such is mentioned. For example: Tadpole is the name of a company that makes SPARCbooks. SPARCbooks are
the trademark of Tadpole, RDI. The Tadpole Logo, Name, and SPARCbook names are of course their property. Treat them as such. SPARC is a trademark of SPARC International, and
they are the standards keepers of this fine architecture. Xacto makes fine cutting implements, and the Xacto Knife is their trademark. Microspeed is the trademark of Microspeed.
Radio Shack is a trademark of their respective holders. Coke a trademark of Coca Cola; Solaris is a trademark of Sun, and so on and so forth. The ones that I do not explicitly list
here weren't forgotten. I just wished to move on with life rather than acknowledging trademarks, however, show respect to the lawyers of these companies, etc. :)
Questions in this SAQ list:
(Seldomly Asked Questions)
This SAQ is best viewed using Netscape Navigator on a monitor that provides 24 bit color at 1280x1024 as the images are rather large. If you are viewing this
with a slow modem, I feel for you, but alas, the detail provided by the images, is far more important than your lack of patience. :) May your soul be spared, should you dare
view this with that nameless evil browser from the town of Redmond, upon which the most foul of plagues has established root and calls itself a software company.
The home of this SAQ will be www.sunder.net/sparcbook/index.html.
URLs to other SPARCbook info
 Click to return to the top.
Installing Memory
RAM upgrades are VERY easy. You will need a matched pair of 60ns 72-pin true parity low profile (1" high) SIMMs.
I got mine from http://www.spartantech.com. Call their phone number to make sure the
SIMMs you get are indeed 1" high, if you get the wrong kind, they'd work, but
they won't physically fit at the same time as your battery.
I got a pair of 32Mb ***LOW PROFILE 1" HIGH **** 72 pin true parity SIMMS.
Cost about $150 or so at the time.
To install these, shutdown your sparcbook with init 5, do not put it to
sleep!!! If you do let it sleep instead, CPR will see more memory and freak
out and won't let you boot! If you see that, don't freak, you'll just have to
either downgrade your RAM back to 32M, boot up, and then shutdown properly, or you can try one of the following tricks:
During the SPARCBook logo screen, press Pause-A, then type in create no-restore? (careful not to ommit the
question mark. And then type in boot disk and it will boot normally.
Should the above trick fail, do boot disk -a and hit enter on every prompt
except the one for the kernel (it will have as a default cprboot). Change this one
to kernel/unix.
Next flip your book over. Unlatch the battery compartment door, pop the door
off. Remove the battery. There will be a thin aluminum(?) cover. Remove
this carefully (carefully so as not to bend it, if you do, the battery won't
fit back in later.) Under this, you should see a thin, paper like plastic
sheet. Under these are two plain old 72 pin parity SIMMs.
Pop'em out, pop in the new ones. Put the aluminum cover back - tuck in all
the notches in the right places, pop the battery in, pop the cover on, close
the cover latch, flip the book over, open the screen. Don't be surprised if
it's already turned on when you open the screen. When you put the battery
back it'll turn itself on.
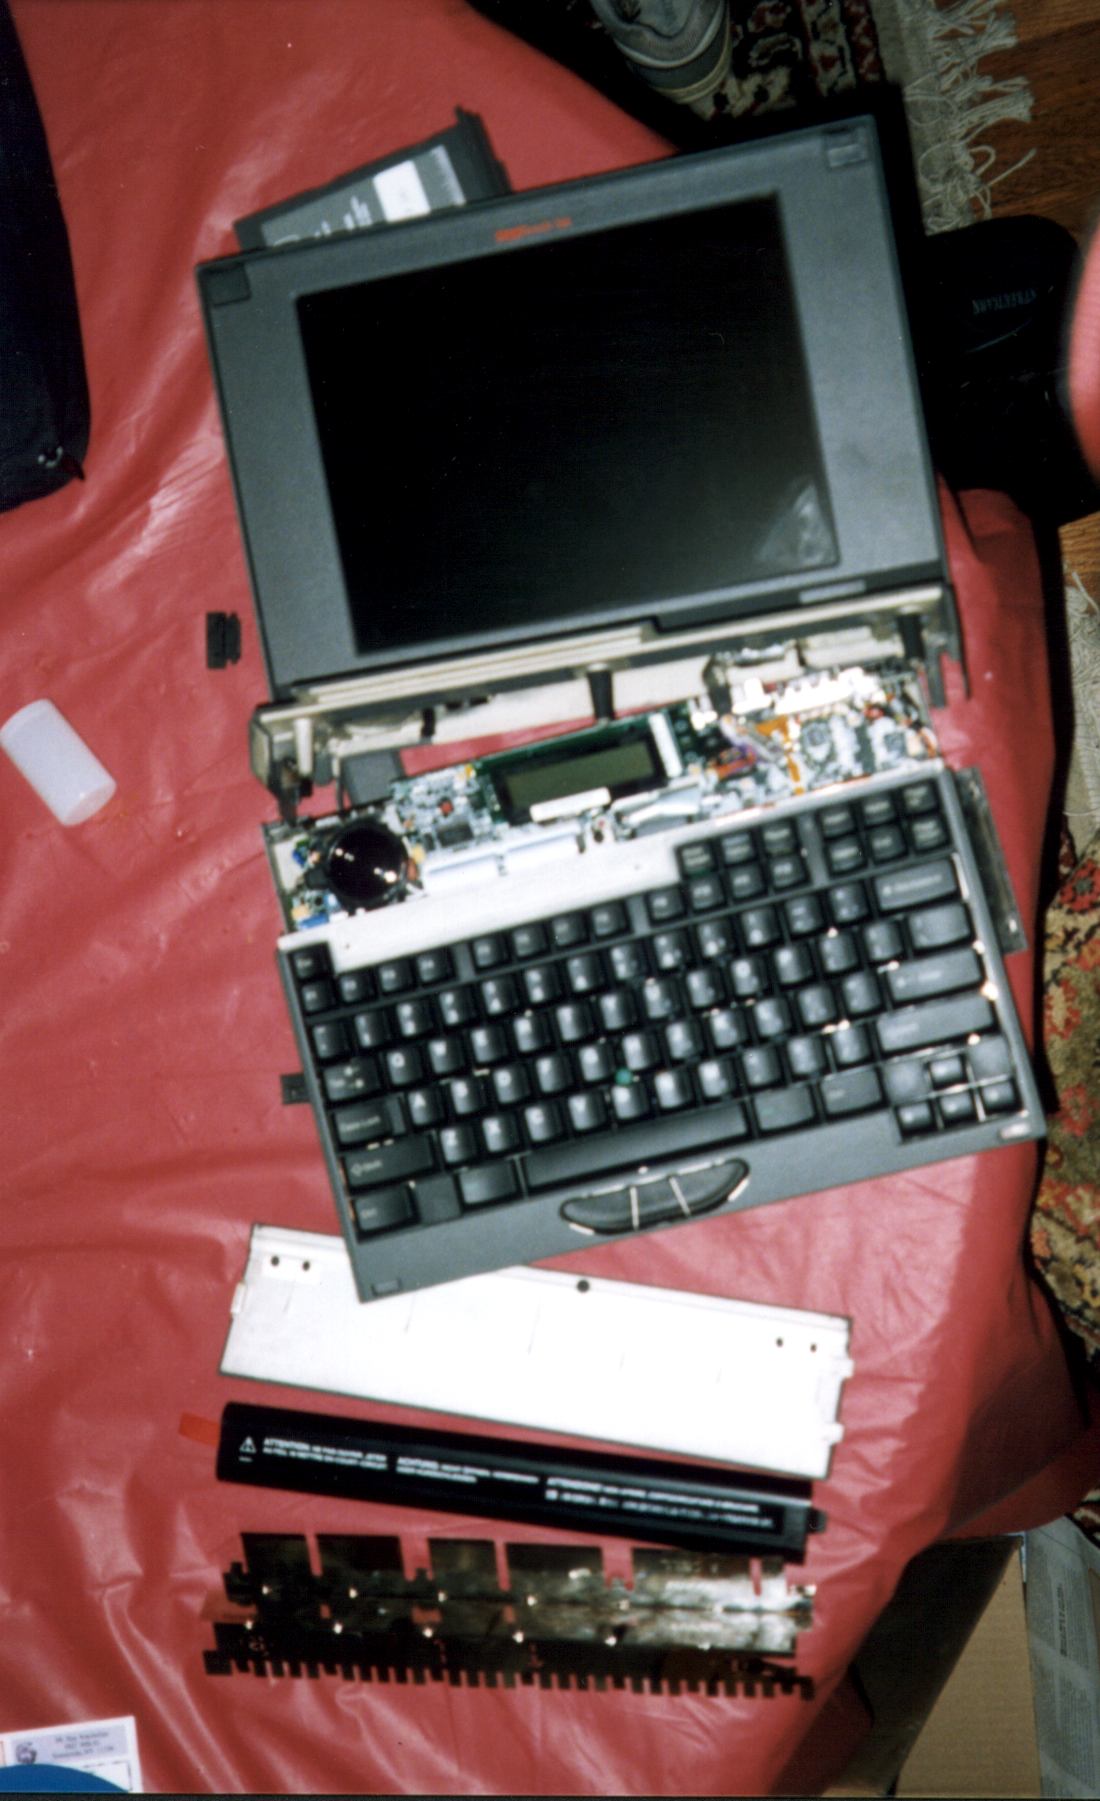
The above image shows: all the way to the left (a bit cropped and too dark) is the
thin aluminum cover that goes over the RAM compartment, to its immediate right,
the NiMH battery stick, to the right of the battery is the battery compartment's
cover. You can see the 72 pin SIMMs inside the battery compartment under the two
sheets of thin plastic film. Above the SPARCbook are the two rubber covers that
go on the left and right back side compartments of the book.
In the middle of the SPARCbook is a silver flatblade screw that's been
removed from the center. There was a round rubber plug above it which is
visible nearby. You do not need to remove any screws to install RAM. If you do
need to open the SPARCbook up, you'll need to take this center screw out along
with the two that are hidden under the pop-up feet (these are visible in the picture.)
Now watch the Open Boot Prom welcome screen (the one with the Tadpole square
graphic) it should now say how much RAM you have. If you missed this and the
OS starts to boot, hold down Pause and A at the same time to get back in the
prom and you can use the prom commands, or just type in boot.
Or alternatively, once booted, run dmesg | more to see what the OS detects.
If you're using Tadpole's suspend option from the NCE stuff, you'll have to
repartition Slice 4 of your disk to match your new RAM size. This is of
course a pain.
Suggestion: ditch 2.5.1 if you're using that, and switch to 2.6 as 2.6 has
it's own CPR built in. I really do wish this was Sol7, but whatever...
Click to return to the top.
Disassembling the SPARCbook
The following set of instructions were posted as part of a message to the
SPARCbook
mailing list.. The subject was my broken pointer, which I'll address a fix
for later in this web page.
So far so bad...  I gingerly popped open my sparcbook today.  I first removed
the battery and the hard drive.

Disassembly/Assembly instructions.

(Standard disclaimers, blah, blah, if you do this and you kill your sparcbook
don't come crying to me, blah, blah, this is dangerous, blah, blah, use static
mats and wrist straps, blah, blah, etc, etc....)


Yep, two screws under the pop up feet, another hidden under a round rubber
plug.  After that you have to open the LCD, and slowly wiggle it.

The peice of plastic attached to it (the screen) that also covers the status
LCD display and two power LED's comes off leaving the keyboard.  Be very
careful not to stress or yank the LCD data cable which is a bunch of lose
wires going to a plug.

Next there's a small black screw on top of the keyboard hold it down.  Remove
this and wiggle the keyboard.  This comes off and you can flip it up on top of
the LCD screen - which by now should be flat.  Be careful not to break
anything.

Next the keyboard itself is indeed a Lexmark (IBM thinkpad) keyboard.  It has
two flat plastic connectors - sort of a plastic film with copper traces on
it.  One is very thin - I suspect it's the accupoint, the other is wider and
is very likely the keyboard itself.

The keyboard is attached to the magnezium(?) bezel by 3 PLASTIC screws.  Why
plastic?  Maybe so incase they fall in it won't short out your book?  It's
also attached to the sides with copper tape.  Careful when you peel these off
so not to rip them.  Maybe they're for heat dissipation or grounding.  Once
they're off the keyboard comes out of the bezel (the 3 mouse buttons remain on
the bezel.)


Unfortunatley on mine, the plastic film cables were indeed nice and tight.  I
suspect it's inside the keyboard that they're lose, or that the accupoint
mouse pointer is indeed dead.  I believe this is due to heat - either it
caused the wires to melt off or fall off or it damaged the accupoint. -- See
the SPARC CPU is soldered upside down on the motherboard right under the
middle of the keyboard (which makes sense for the copper tape being used to
possibly dissipate heat.)

Ok, to put things back together, go backwards.  First, push the keyboard back
in its bezel making sure that the screw holes align and that it's flush
against the buttons.  Then screw in the 3 plastic screws.

Then carefully place the keyboard bezel back on top of the machine - there are
metal flanges on the sides next to the PCMCIA and HD ports that you'll have to
tuck back in.  Make sure the keyboard belzel screw hole lines up.  Screw in
the small black phillips screw.

Next, be VERY careful with the display.  Align it carefully and slowly lower
it onto the bottom half of the sparcbook. Once it's in, close the lid making
sure it doesn't fall out of alignment.

Flip the book over, screw in the two large screws under the feet, and the
smaller aluminum flathead screw in the middle, close the feet, put the rubber
stopper back on the aluminum screw.

Put the hard disk in FIRST, then the battery - soon as you put the battery in
the sparcbook turns on!  Close the battery compartment door and lock it.  Flip
the book over, and open the lid...  Hopefully it will boot up. :)

Mine did, but scared me a bit.  The LCD flickered a few times. :(  I didn't
have time to take it apart againt, and I won't until I get a replacement
keyboard....


For those who are curious, I did take 3 pictures, but I've about 21 more
frames on that roll of film, so you'll have to hold your breath for a while.

Can I just post them as attachments on here or does the mailing list not allow
them? (If not, I'll throw'em on a web page.)


As for my poor book, I'm gonna look for Thinkpad part dealers and see who has
the right model, and yup, it's basically a thinkpad with a custom
motherboard...  Hopefully the new keyboard won't be too expensive...


--
---------------------------- Kaos Keraunos Kybernetos --------------------
 + ^ +  Sunder              "The real aim of current policy is to     /|\
  \|/   sunder@sunder.net ensure the continued effectiveness of   /\|/\
<--*--> ALLOW FREE EXPORT    OF US information warfare assets against\/|\/
  /|\   STRONG CRYPTOGRAPHY! individuals,businesses and governments   \|/
 + v +  PROTEST WASSENAAR!!! in Europe and elsewhere" -- Ross Anderson
---------------------------- http://www.sunder.net -----------------------
Click to return to the top.
Adding backlighting to the LCD status pannel, and repairing a broken pointer
(First see the above RAM installation instructions for a picture on how to start opening
the SPARCbook, and do remove the screws.)
The following set of instructions were posted as part II of a message to the
SPARCbook
mailing list.. The subject was repairing my broken pointer, which I address here:
Ok, so over the weekend I've done some rather nasty Sparcbook Surgery with
some good success.


The previous standard disclaimers about NOT doing this to your sparcbook and
about how you could damage it and destroy it beyond repair and voiding
whatever warranty you may have apply.  Strongly.  (Also let us not totally
ignore that standard disclaimer about technical gobbledygook for those who
start to snore reading such things...)


What? You're still reading this after that stern warning? Well, ok, I'll tell
you about it.

I found a Thinkpad repair shop in The Processor and ordered a Thinkpad
Keyboard (they wouldn't just sell me the Accupoint mouse pointer by itself.)
It was $65 for a keyboard for a TP 365 (I bought this model since I have a
real IBM Thinkpad 365 at home - figuring that it wouldn't hurt to have some
spare parts around.)

What's the logic behind this?  Welp, I popped off the keys to both the
sparcbook and the Thinkpad and have noticed that the nipple pointer (accupoint
for those who have no imagination) is nothing more than a mini joystick
surface mounted on a small triangular PC board.  (The keys to pop off are
V,B,N,G,H, and J.)

There is a flat clear orange colored plastic strip with copper leads inside of
it that provides the signals to the SparcBook.

Both the Thinkpad and the Sparcbook have this device and it looks identical.
It almost is.

However the cables are different.  The sparcbook one has a different path than
my TP365's.  Enough so that I couldn't just plug the TP one into the
Sparcbook's port.

Here's where it gets ugly.

The keyboards themselves if you take them apart (PLEASE DO NOT!) are composed
of a plastic top containing small round holes with punchers in them.  Above
those go plastic calamari like rubber pieces that provide the keyboard
bouncyness.  Above those go the keycaps.  Under the plastic board are two
clear plastic sheets with inlaid flat wires (copper maybe?)  When you strike a
key the contacts on the two sheets mate and cause a signal.  Behind this is
the aluminum cover, etc.  On my Sparc this is taped down (yuck!).

So far so good, right?  The problem is that the accupoint (what, you expected
me to call it a nipple twice?) goes between them!  To get the Accupoint out,
you'll have to disassemble the keyboard, which isn't too hard.  If you pop off
ALL the keys, you'll notice clips keeping the aluminum backing locked to the
plastic top.

But aluminum cover will bend out of shape if you remove it, and thus you'll
destroy your keyboard!!!  Yes, push the clips down if you will, but I've not
found the right way of doing this, if you know how, let me know.  No, I'm not
a dumbass, I didn't destroy my Sparcbook keyboard.  I destroyed the spare
Thinkpad 365 keyboard. :)  Thanks for asking.

Ok, so I managed to get the accupointer out.  Now for the second part of the
nightmare.  (And this took most of 3 hours of labor to get right.)

So now that I removed the accupointer out of the TP365 kb, I had to remove the
old accupointer out of the Sparcbook keyboard.  That was easy, since it was
dead, I simply cut it out with a razor blade.

Getting the new one in was a chore since the flat plastic wire doesn't have
the same path, and even if it did I wasn't about to take my one and only
Sparcbook keyboard apart.  :)

So I ran it around and under the keys, under my right Alt key (which was dead
anyway) into the area where the three mouse buttons are and from there to the
back of the keyboard.  So far so good, now the fun part: getting to mate with
the port on the sparcbook...

I'm fairly good with a soldering iron and I had some scrap thin wire around
from a (oh the irony!) dead Microsoft Mouse.  (heh!).  I soldered wires onto
the flat tinned connector coming from the accupointer that would go inside the
sparcbook.

The problem with this is that the leads are too close together and I kept
soldering shorts from adjacent leads.  That sucked.  So I took my Xacto and
separated them out.  One by one, I soldered a wire to each lead and covered it
with tape to keep 'em from shorting.  That took about an hour of careful
soldering and left a flat mess of wires on the back of the keyboard.  No
problem.   Half of the problem was solved.

The remaining: now that I have six wires, how do I "plug 'em" in to the
Sparcbook's rat connector?  Welp, guess what I still have the dead accupointer
that was originally in there.  I cut off it's plug and proceeded to slowly
shave the plastic off the leads until I had exposed each of the six wires.
After that, some more soldering and hot melt glue did the trick in isolating
them from shorting.

I plugged everything back in careful to not crimp any wires or short anything
out.

Part two: someone suggested that a light up status LCD pannel would be nice to
have.  Solution: hot glue two LED's to the side of the panel.  It worked, only
I've not found a source for good juice to power them from.  I'll take
suggestions.  What I used: the green charging LED.  I soldered my two new
LED's to this LED's solder joints (which are right under the status panel.)
Be careful if you do this as you could short out other components, and if
solder falls in the board, you hose your Sparcbook.

It worked except the charging LED doesn't have enough power to run three
LED's, so the two new ones are VERY dim.  So no backlight (yet!)  I just need
to trace where the incoming power gets converted to +5V and GND - no only a
dumbass will connect a pair of 3v LED's to a 12V power supply. :)

I'll solder these to that. (+5V/GND)  I'd rather not get it from the battery
circuit as the two LED's will suck up much needed battery power (yes, I know
they're low wattage, but every millisecond of battery run time counts and all
that...)

So at the end I closed everything back up carefully and nicely and powered her
up.

[Another interesting side note:  The Sparcbook has a solder jumper for the
memory voltage.  There's one for 5V and one for 3.3V.  So if you can find low
voltage RAM, that MIGHT work and drain less battery, but then again, it might
not...]


Results of Hacking:

Guess what: the accupointer worked with one small hitch.  The Vertical and
Horizontal directions were swapped.  Yup, to go UP I'd have to drag the
pointer LEFT! :)

Ok, so the next time I'm gonna take the 6 wires into a breakout box and figure
out which is what...  (This is low priority...)

There are six wires, and four directions, so I suppose two of those are power?
and the remaining four are Up, Down, Left, Right.  Not 100% sure on this, but
it's my guess.  So I'll have to figure out which wires to swap around while
the sparcbook is running...


Comments?  Love to hear 'em.  Esp if they are hints as to what pins are what
on the accupointer and where to steal +5V for the backlight LED's. :^)
--
---------------------------- Kaos Keraunos Kybernetos --------------------
 + ^ +  Sunder              "The real aim of current policy is to     /|\
  \|/   sunder@sunder.net ensure the continued effectiveness of   /\|/\
<--*--> ALLOW FREE EXPORT    OF US information warfare assets against\/|\/
  /|\   STRONG CRYPTOGRAPHY! individuals,businesses and governments   \|/
 + v +  PROTEST WASSENAAR!!! in Europe and elsewhere" -- Ross Anderson
---------------------------- http://www.sunder.net -----------------------
Click to return to the top.
Here are the pictures related to the above hack:
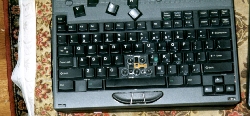
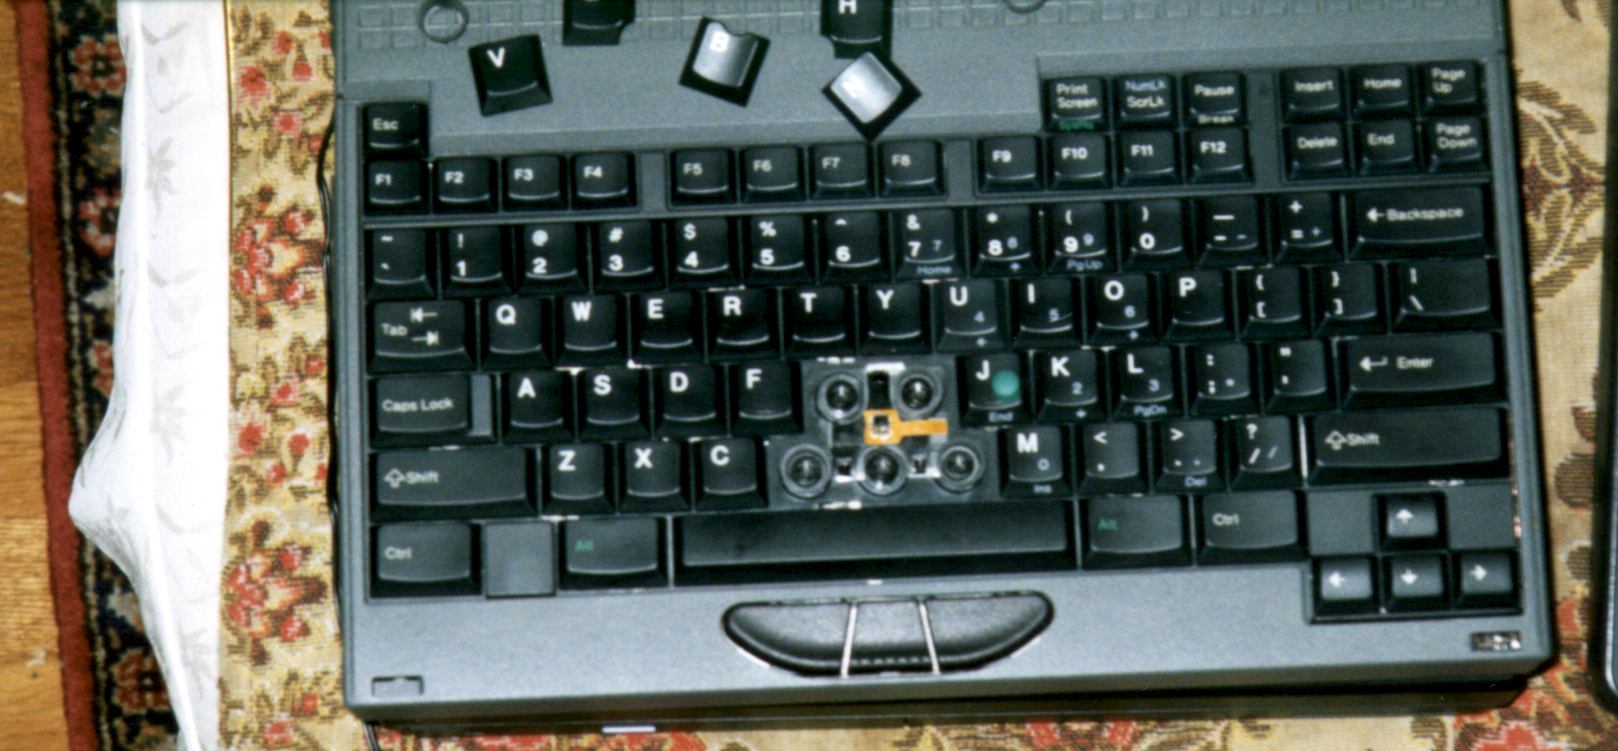
Here you can see the SPARCbook open, with several keys popped off around the pointer.
The green eraser head cover is resting on the "J" key. The original Accupoint pointer is visible
in this image. The round objects are the rubber key springs on top of the actual key switches.
The pointer circuit board looks roughly like a triangle with circular sides. The orange box
around the pointer stick is actually the thin film ribbon with the copper traces that carries
the signals down into the keyboard. Again, removing this is not possible without damage to your
keyboard.

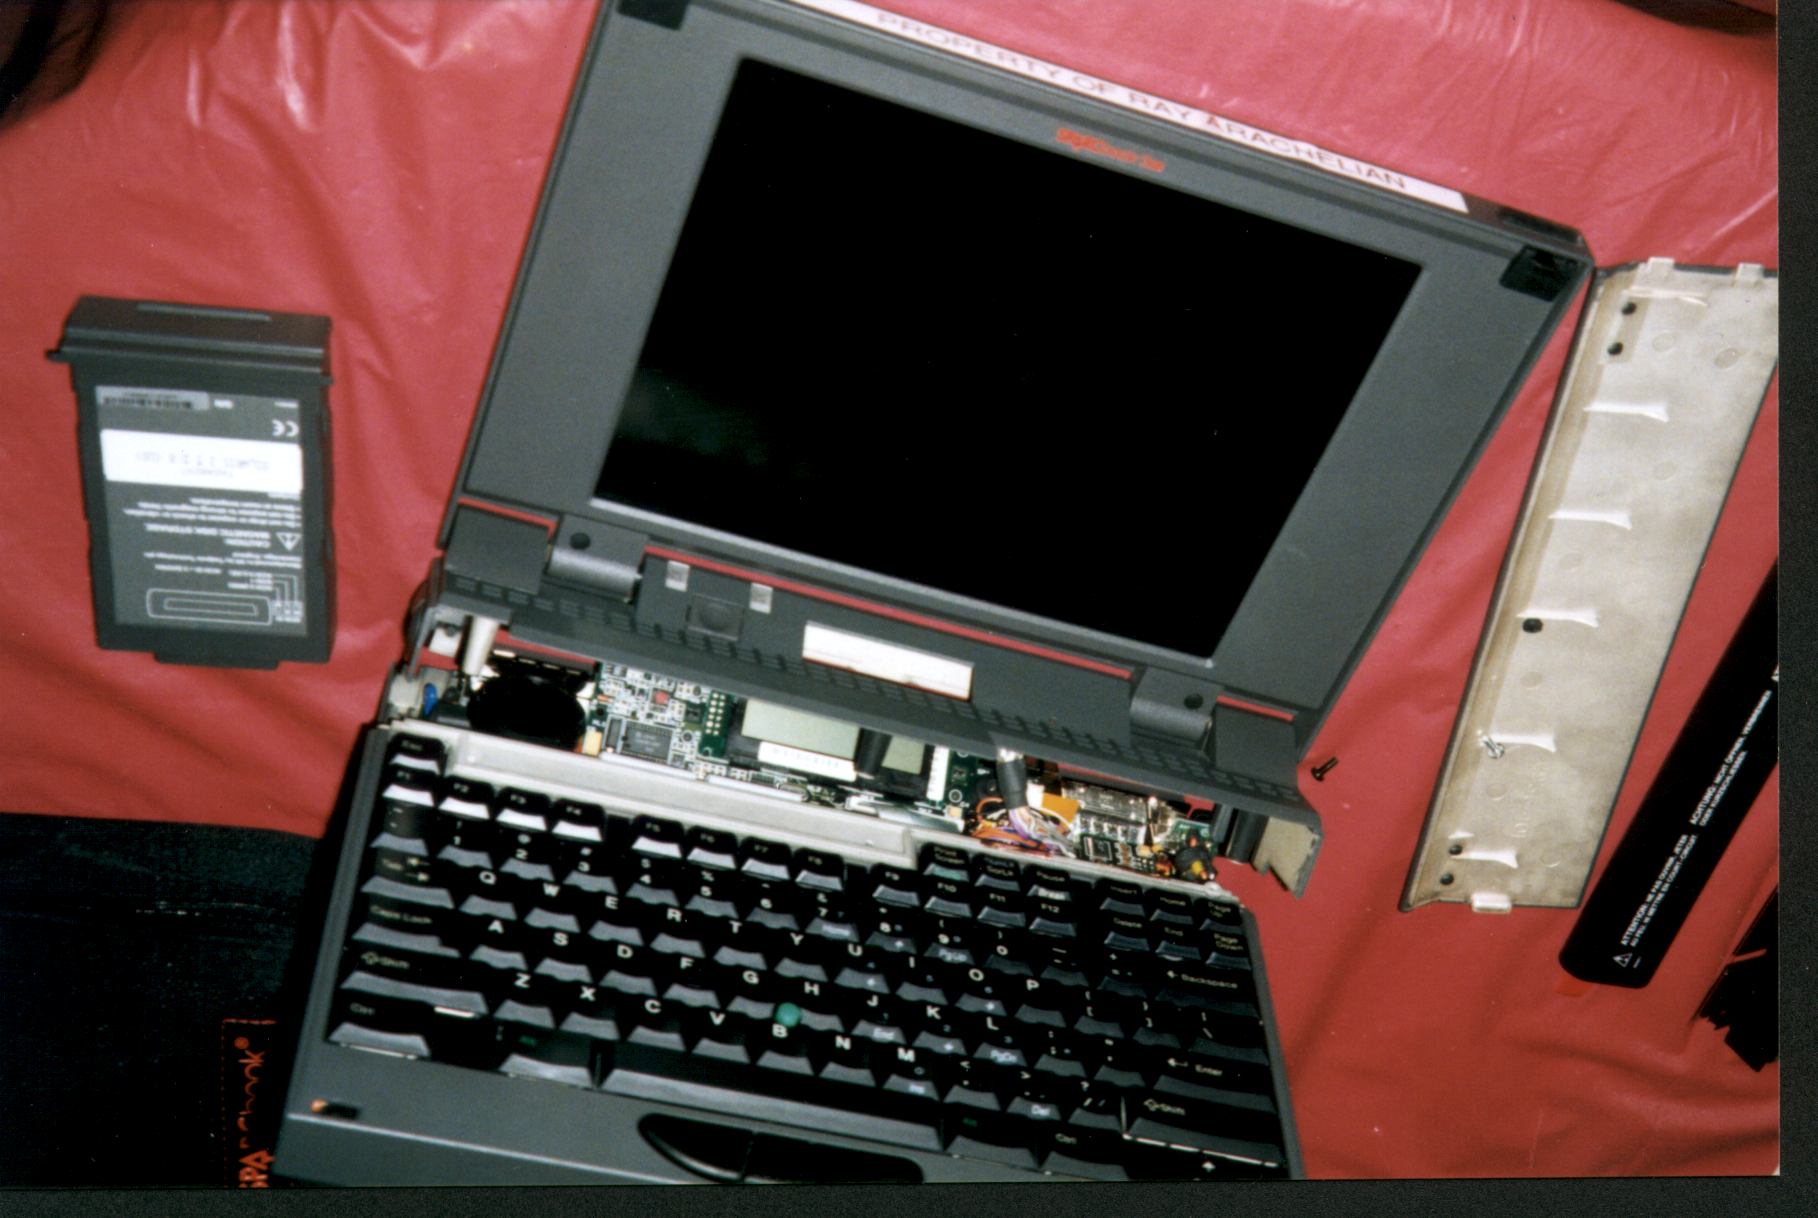
Here you can see the display "popped" off. This happens after you unscrew the three screws on the
back. (Two are under the feet, one is hidden in the center under a rubber stopper.). You flip the
book over, open the lid, and carefully lift it. The hard drive visible in the upper right. The
battery, the battery compartment cover, and a screw is visible to the right of the SPARCbook. I've
rested the bottom of the SPARCbook on the carry case.
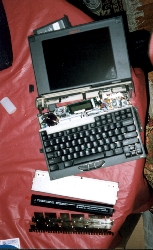
And here is a vertical view of the same. Under the SPARCbook you can see the battery compartment
cover, the battery stick, and the thin aluminum metal RAM cover (too dark to see it in this picture
as silver colored, but it is.)
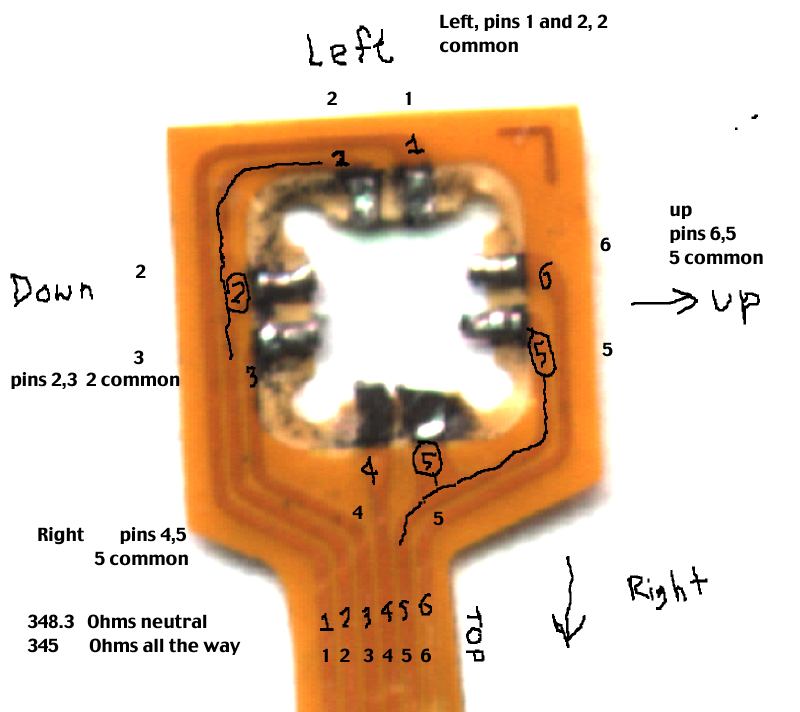
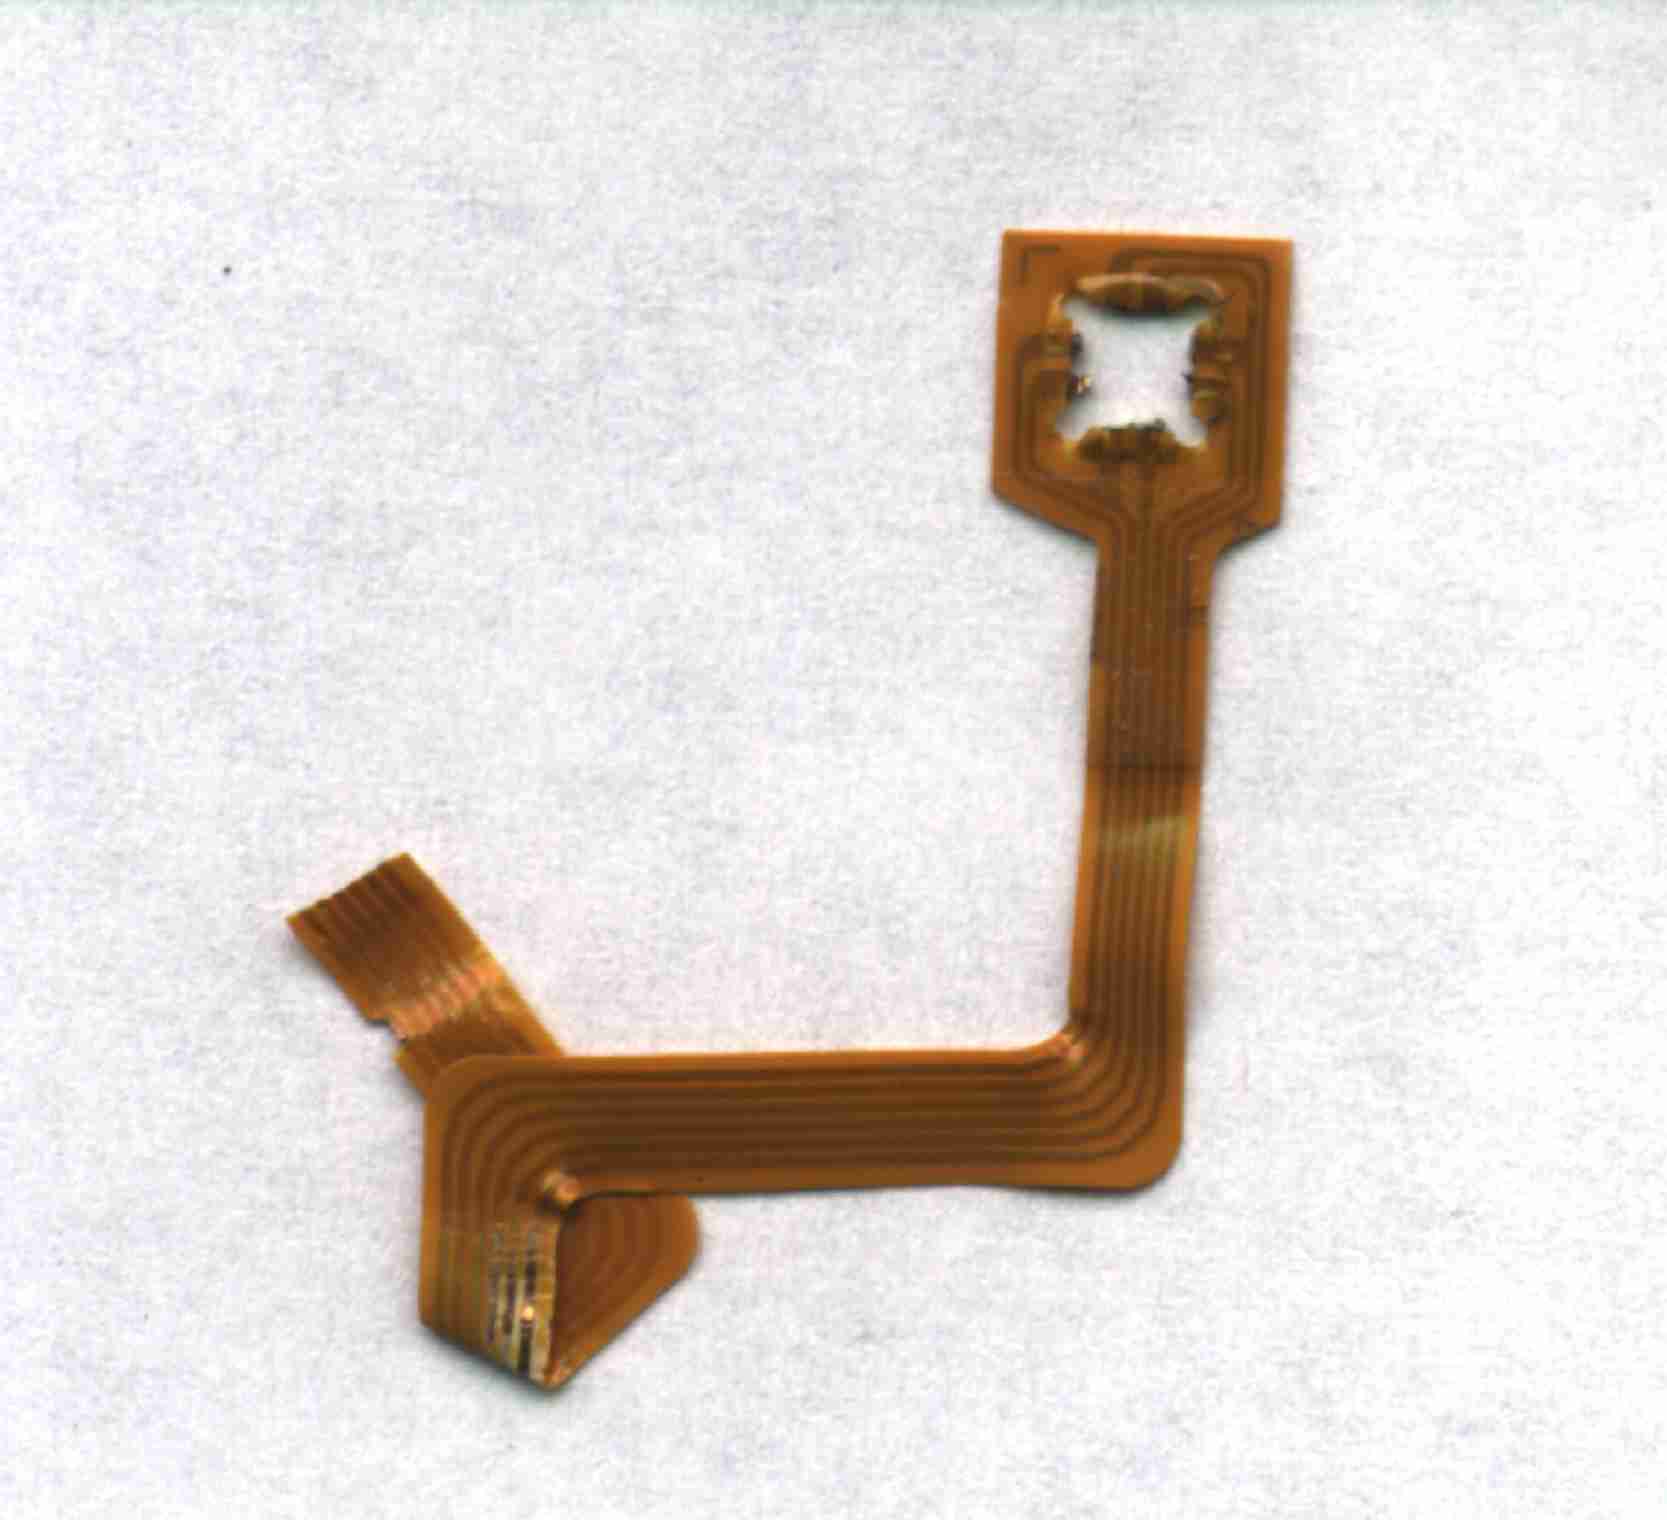
Here is the wire connctor removed the dead Accupoint and scanned in at 2400dpi so as to show the pin outs:
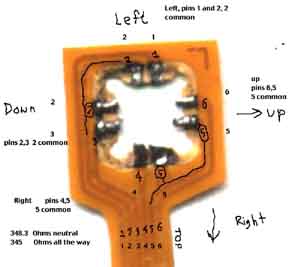

Perhaps the above information can be used to reconstruct them, but likely what happens is that
the fragile ribbon cable breaks, or the small solder joints break from the cable. This
is a very hard repair unless you can track it down and have super fine soldering skills.
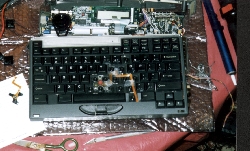
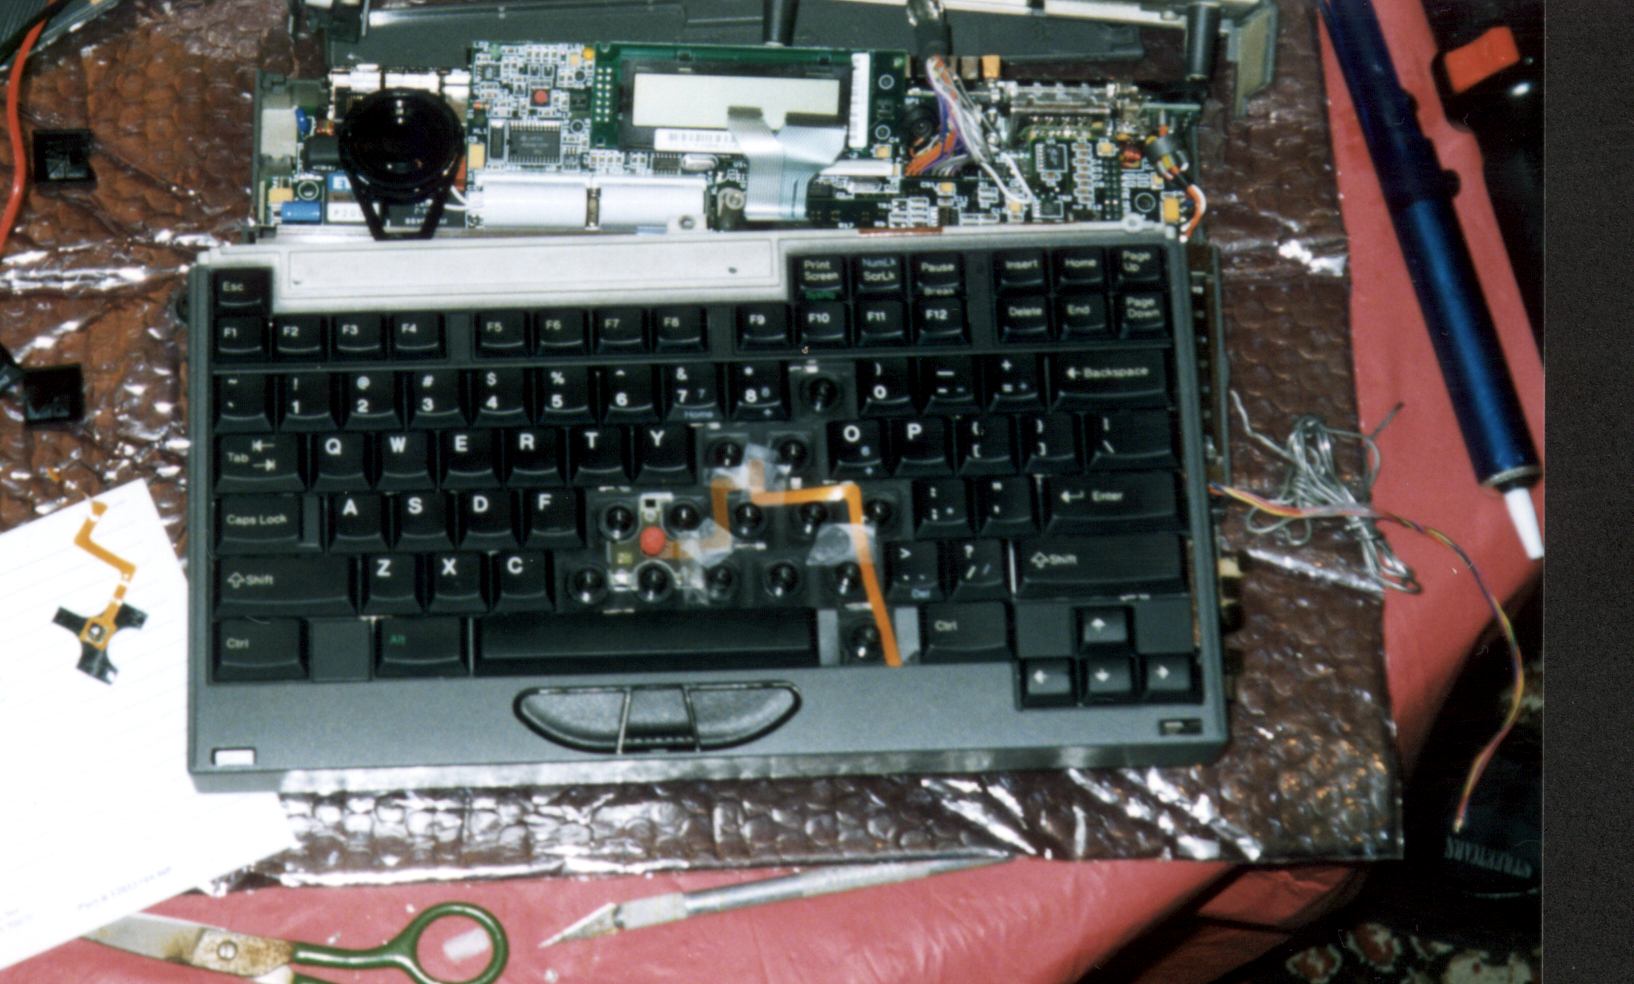
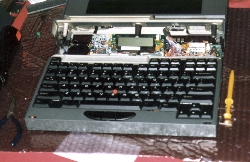
In this image, you see the replacement pointer from an IBM ThinkPad 365 keyboard "installed."
It has a red rough plastic (coral like) tip which is installed on the stick. It's ribbon cable is
snaked in between the keys and kept down with clear tape. To the left of the SPARCbook on a white
bit of cardboard is the removed old pointer.
They keyboard is held down by a single black screw at it's top. This is right above the white strip
of plastic, and right under the pair of ribbon cables. If you look at the screw pipe that mates with
the display, you'll see the screw hole in the image. If you still can't see it, look right above the
area between the F8 and F9 keys. No, not the little pinhole, but above to the left of that, there is
a square tab with the screw hole that's attached to the white plastic area.
In the image you can also see the LCD status display along with it's green and orange LED's, and
two ribbon cables from the keyboard. These are disconnected and resting on the LCD.
The round black object is (I think) one of the two speakers. The second one is to the right of the
LCD panel, is much smaller and labeled SP1. This 2nd speaker is difficult to see in the image. To
spot it look for the two vertical circles. It's to the right of them next to the orange, blue and
white cables going upwards to the display. (If you still can't see it, look right above the PAUSE key.)
To the right of the SPARCbook is a bunch of cables in a pigtail going out of the keyboard. These are
shown more clearly two images down, these are soldered to the Accupoint's flat ribbon pad.
To the right of these you can see a Soldering Pump from Radio Shack, and a power screw driver. Under the
SPARCbook is a pair of scissors and an Xacto knife.
Back to the SPARCbook, if you look all the way to the
top left, you'll see an orange and white wire pair going through a ferrite nut. These carry power from the
external supply.
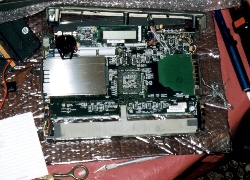
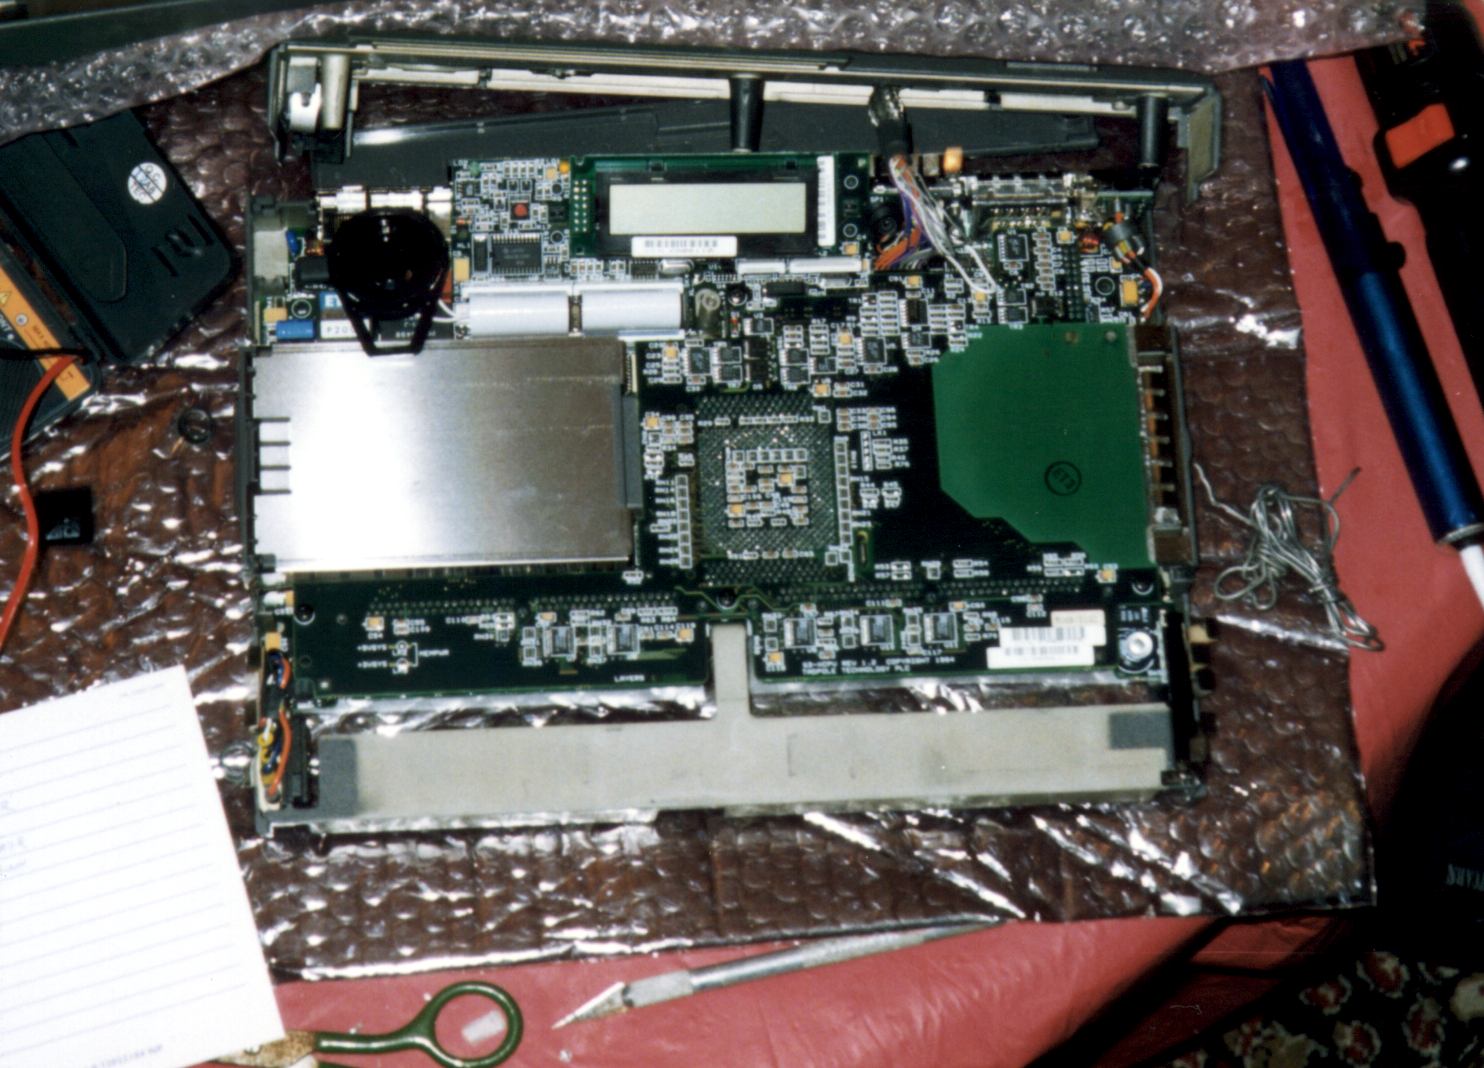
This image shows the SPARCbook's motherboard. This is visible after you remove the keyboard. Sights of
importance: the large silver square area on the left is where the hard disk goes. To it's immediate right
you can see the pins where the SPARC v8 CPU is soldered on the reverse side. Underneath this area you will
see two sides with some foil sticking out. This is where the RAM lives (on the flip side.) On the left
right above the split are a pair of solder bead jumpers that control the voltage of the memory. 3.3V and
5V are listed with the 5V shorted. I suppose if you can find 3.3V SIMMs, you could solder the other
bead, but I don't know for sure, and if you do this and fry your SPARCbook, don't come crying to me. :)
The large green area to the right is the spot where the PCMCIA cards go. (Not that you give a shit,
but to the right of that are a pair of solder bundles which I used to solder stuff. :)

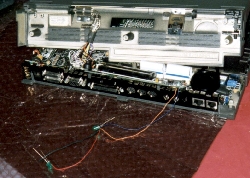
This is the back of the keyboard. On the left of this picture is my portable VOM, under that the white cardboard with the order of the pigtail
wires from top to bottom of the Accupoint mouse connector, and the pigtail itself on top of the card. If you
follow it to the right, you'll see the soldered wires. They're taped down with clear tape to keep them in place,
on the back of the keyboard, and they go to the connector pad of the ThinkPad 365's Accupoint, which I've split into
individual wires using the Xacto knife. The large orange square to the left is the copper tape used to hold the
keyboard together. On the right you can see a 90 degree "elbow" of the old SPARCbook Accupoint plastic cable which was
cut off. The wide part on the top left is the connector, though the picture doesn't clearly show it, each of the six
copper traces in this plastic film leads to a solder pad. This is the flimsy connector which mates with the SPARCbook,
that connector is on the right of SP1 (the second speaker I mentioned earlier. It's a white plastic connector.)
This image shows the two green LED's soldered in parallel to the panel's charging green LED.
(The connection on the left side of the charging LED is +5V the one on right is GND. At least I
think that it's 5V. The polarity is correct. You can tell by notch on the charging LED.)
I next trimmed The LED's tails's off and isolated them with hot melt glue. I attached them to the
left and right of the LCD pannel. Again, getting power from the green charging LED is a bad idea
as it doesn't provide enough and these two are very dim - too dim to light up the LCD pannel.
A better thing would be to attach a nice big resistor (a few KOhm) in series with the two LED's - enough
to lower the voltage to 5V, and wire that to the incoming power. I didn't try this (yet).
This image shows you (if you can squint and look closely) the two LED's hot glued to the LCD pannel.
Look carefully at the two splotches of green to the left and right of the LCD pannel. The LED's wires go
under the LCD pannel, and these are visible (red). The yellow blobs are the hot melt glue.
Click to return to the top.
Upgrading MicroSpeed Trackballs for SPARC machines
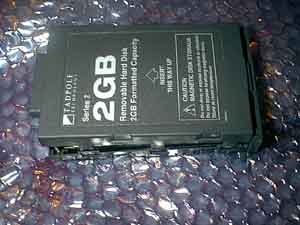
A bunch of us purchased bundled SPARCbooks from the great Herman Miller / Ross Pennington liquidation sale. (These were
sold for $200 for 85Mhz 3GS's and $400 for the 110 3GX's, and are now sold out.) They included a PCMCIA hard disk, a
carry bag, and as an added bonus, a MicroSpeed trackball. Now, I'm a spoilt fuck, and have been using nothing but
Kensington Expert Mouse trackballs on PC's and Turbo Mouse trackballs on my Mac's. These are great trackballs.
In comparison (not to bad mouth Microspeed), the Microspeed trackballs, don't have the same luxurious feel (no
disrespect to Microspeed who were nice enough to make'em.) In this message
(also to the sparcbook list), I provide a typical hackish upgrade:
The plastic balls that come with these trackballs suck ass and have a very
cheap feel to them.  Here's how to fix'em:

First, go and order a Kensignton Expert/Turbo Mouse replacement ball (PC/Mac
Warehouse, PC Zone, et al used to have'em as either "8-Ball" or iridescent
blue/red 2 years ago for $10-$15, not sure about now and I don't see it in
their catalog, but ask around.)

Buy one, or get the normal white one from someone who bought an 8-Ball or one
of those funky iridescent blue ones for their Kensington. :)

Next get a screw driver and open up the Microspeed.  Clean out all the debris
off the rollers - sadly the rollers here are cheap plastic rollers and part of
the "cheap" feel comes from them.  I've not found a way to replace these, but
if I come across a dead Kensington, or a suitable mouse/trackball with metal
rollers, it'll be worth a shot...  Anyway, clean them rollers and clean'em
well.

Then throw away the cheapo lightweight Microspeed ball and use the Kensington
one - they're the same exact size.  They've a much much better feel due to the
coating and the weight.  :)  Trust me, you'll like'em with it...

Then, every few months when the feel starts to get gritty take the trackball
apart, wash the ball, clean the rollers, and put it back together... :)


(What's really strange is that the Turbo/Expert Mouse trackballs never go
under $89... even after so many years...  Guess there's enough suckers like me
who like their quality...)

--
---------------------------- Kaos Keraunos Kybernetos --------------------
 + ^ +  Sunder              "The real aim of current policy is to     /|\
  \|/   sunder@sunder.net ensure the continued effectiveness of   /\|/\
<--*--> ALLOW FREE EXPORT    OF US information warfare assets against\/|\/
  /|\   STRONG CRYPTOGRAPHY! individuals,businesses and governments   \|/
 + v +  PROTEST WASSENAAR!!! in Europe and elsewhere" -- Ross Anderson
---------------------------- http://www.sunder.net -----------------------
Click to return to the top.
Open Letter to Tadpole. RDI regarding Solaris 7 drivers
The following message was posted to the sparcbook list as well as emailed to Tadpole.
It was written because Tadpole decided to no longer provide the patches that activate
useful things in a SPARCbook such as Power Management, the mouse pointer, the PCMCIA
slots, and oh yea, the video display (Doh!)
Right now, the best you can do is install Solaris 2.6, and then download the drivers
from Tadpole's FTP site. This will work fine, but if you want Solaris 7, you either
pay Tadpole $450 for a copy of Solaris 7 with the patches, or you go scratch.
I did ask if they would accept an exchange. i.e.: I FedEx them my copy of Solaris 7
plus some money, and they FedEx me their version of Solaris 7 plus patches, but nothing
has happened since. Here's the letter:
To whom it may concern,

I, as well as many members of the sparcbook owner's mailing list, have
recently purchased $200 and $400 SparcBook 3GS's and 3GX's.  These came with
older versions of Solaris, specifically 2.5.1.

Many of us have purchased Solaris 7 directly from Sun, some as hobbyist
licenses, I personally have purchased a subscription from SunSoft a few years
ago, right before the release of 2.6 for both Intel and Sparc distributions,
and thus we own licenses to use Solaris 7.

We thank you for releasing the 2.6 Tadpole patches enabling us to run Solaris
2.6 on our notebooks.

I understand that recent conversations with your company have described that
you are ready to release a version of the Solaris 7 patches bundled with a
copy of Solaris 7, but have no plans at this time to release the actually
Solaris 7 patches on your website or to even sell them individually.

I find it rather expensive to purchase an extra copy of Solaris 7 with patches
for $400 for a notebook that I've paid only $200.  I would be perfectly
willing to purchase the patches individually for a reasonable price, say
$50-$100.

If it would be alternatively possible, I would also be perfectly willing to
mail you my copy of Solaris 7 as I have received it for Sun in return for a
copy that has the Tadpole Sol 7 patches with it.

Please understand that we are mostly hobbyists and cannot justify paying $400+
dollars for yet a duplicate copy of Solaris, when we only require the patches
to make our notebooks useful.  There is no question of licensing as we have
already paid Sun for a license for them.

Many of us do not have copies of Solaris 2.6 as Sun no longer offers them at
the hobbyist price and thus cannot use the 2.6 patches as they are not
compatible with Solaris 7.

Some of us would happily run a free operating system such as Linux, friends,
BSD or Open BSD, however, the hardware drivers for these operating systems are
not yet available.  I personally would rather run Solaris on my SparcBook as I
am sure most of the owners of these notebooks would.

We hope that you will offer us an acceptable way to be able to use receive the
Solaris 7 patches.

Thank you for your time and understanding.
 -- Ray Arachelian.


--
---------------------------- Kaos Keraunos Kybernetos --------------------
 + ^ +  Sunder              "The real aim of current policy is to     /|\
  \|/   sunder@sunder.net ensure the continued effectiveness of   /\|/\
<--*--> ALLOW FREE EXPORT    OF US information warfare assets against\/|\/
  /|\   STRONG CRYPTOGRAPHY! individuals,businesses and governments   \|/
 + v +  PROTEST WASSENAAR!!! in Europe and elsewhere" -- Ross Anderson
---------------------------- http://www.sunder.net -----------------------
Click to return to the top.
How to install Solaris 2.6 on a SPARCbook
If you can boot off the CD, you should be Ok.  Just to be safe, you might want
to hook up an external hard drive as well and dd your old one to it from the
CDROM.  (That is if you can still boot off the old drive)

Boot the cdrom from the Open Boot Prom this way: boot cdrom -SVR (-S says
single user mode, V says verbose R says reconfigure.)  This will keep the
install scripts from coming up.  If they do come up, hit Control-C to get at a
shell, then mount the external drive.  Run format to see the partitions on
your internal sparcbook disk and just do this:

dd if=/dev/dsk/c0t0d0s0 of=/mnt/slice0.dd
dd if=/dev/dsk/c0t0d0s3 of=/mnt/slice3.dd
...
dd if=/dev/dsk/c0t0d0s7 of=/mnt/slice7.dd

etc... (change the paths as needed. Above assumes you mounted a big enough
slice off the external disk to /mnt, etc...)  Usually slice 1 is for swap,
slice 2 is the entire disk (don't bother dd'ing that) slice 4 is for the NCE
memory dump if your book has that enabled.

For Solaris newbies: c0 means SCSI controller 0, t0 means target 0 (scsi ID)
d0 means disk 0 or Logical Unit Number 0, s0 means slice 0 (partition 0).


I'd also get all the 2.6 Recommended and Y2K patches and install them right
after to bring Solaris up to date.

The installing and patching will take a long time, so make sure you have more
than adequate ventilation, since power management will not be working and
your CPU will run at full speed causing your powerbook to overheat.

Raising the feet is a good idea, aiming a fan/AC in addition is even better.

Re: version of 2.6:  I'm not sure which 2.6 I used, but it's likely a very old
one as Sun sent me CD's on the first edition of it.  I've had no problems with
the install.  It isn't sever though, it's the normal workstation, however I
suspect that won't affect anything.

Also: After you apply the Tadpole drivers, be sure to also apply the patches
to the tadpole drivers.

Download the drivers from:
ftp://ftp.tadpole.com/pub/sbu/S3-patches/Solaris_2.6/
The drivers are: TTI_Solaris_2.6_packages.tar.Z
 and the patches to these drivers
(to fix bugs) are bundled in: TTI_Solaris_2.6_patch_bundle.tar.Z

However, sometimes there are patches outside of the patch bundle, so please
visit their ftp site and download any patches that are not in the patch bundle.

So your install should be:

1. Install Solaris 2.6
2. Reboot
3. Install Tadpole Drivers
4. Install Tadpole driver patches.
5. Install latest Solaris 2.6 Recommended patches
6. Install latest Solaris 2.6 Y2K patches.
7. Install GNU software, etc. :)  (Make sure you leave enough room on /opt and
/usr/local for GNU wares - it's best to give these their own slices.)

I usually ftp my GNU warez from sunsite.unc.edu (now renamed to
metalab.unc.edu) :)  Solaris patches you get from Sun's ftp sites (or
access1.sun.com's driver page.)  Tadpole
patches from ftp.tadpole.com, etc...


"Scott D. Yelich" wrote:
>
> The FAQ is not clear.  I'm asking now, but I'll know myself, for sure,
> soon... as I've hosed my 2.5.1 by playing with it.
>
> I have Solaris 2.6 server, but only a 1997 version.  My question is, can
> I install this and put the 2.6 patches and still have a working system
> with a video driver?  The FAQ says that 3/98 (or 5/98?) seem to work
> fine... but does not state whether earlier or later versions work.

--
---------------------------- Kaos Keraunos Kybernetos --------------------
 + ^ +  Sunder              "The real aim of current policy is to     /|\
  \|/   sunder@sunder.net ensure the continued effectiveness of   /\|/\
<--*--> ALLOW FREE EXPORT    OF US information warfare assets against\/|\/
  /|\   STRONG CRYPTOGRAPHY! individuals,businesses and governments   \|/
 + v +  PROTEST WASSENAAR!!! in Europe and elsewhere" -- Ross Anderson
---------------------------- http://www.sunder.net -----------------------
Click to return to the top.
How to upgrade the hard drive on your SPARCbook
If you have a drive that's smaller than 2Gb, then you'll have to buy a drive
with an IDE to SCSI converter from ADTX. One can be found at
wwww.powerbook1.com for $399 + shipping.
If you do have the 2Gb disk, then what you already have the IDE to SCSI conversion
card, and you can buy whatever 2.5" IDE disk fits your needs. You might wish to
stay away from capacities higher than 6Gb as I'm unsure what the limit of the
ADTX converter is. I bought a Toshiba 6.0Gb disk from
www.dirtcheapdrives.com for (as of this writing $159.
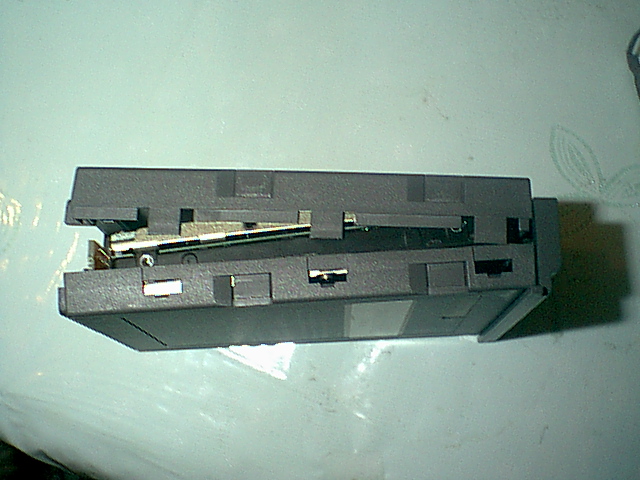
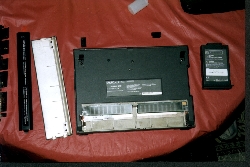
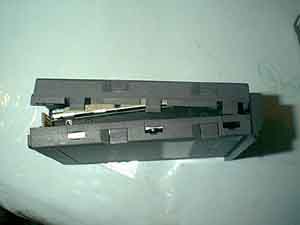
First, remove the drive from the bay and place it on an Anti-Static mat.
To do this, turn your SPARCbook's left side towards you, using your thumb, pull
down on the hard drive latch. Once it moves down, you can now pull the drive
out:
Now, take a small, flathead screw driver and pry open the latches on the sled.
Be careful not to drop, hit, slam or shove the screw driver in to the drive.
After all, if your new drive arrived DOA, or gets damaged, you won't be able
to go back.
Carefully pry open both sides. Don't pull the two sides open all the way. You
can remove the drive by sliding it out.
Note that the SPARCbook sled has its own special SCSI cable complete with a
set of dip switches for the SCSI ID. You'll need to save this part.
Next, pull the drive out and lay it down on upside down.
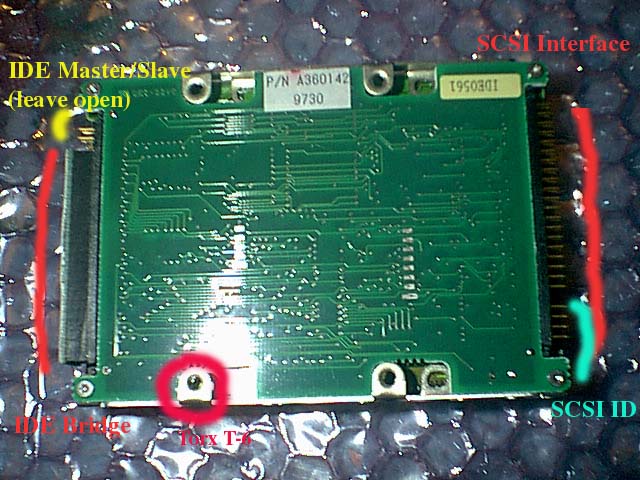
You'll now need a
TORX T-6 screw driver which, for me, was impossible to get. Hopefully you'll
have better luck. You'll have to remove all the T6 screws off the bottom of
the IDE-SCSI interface board. I used small needle nosed pliers and lots of
patience to pry off the screws. Although I don't recommend it, you can wiggle
the metal rails that separate the drive from the IDE-SCSI interface with the
pliers to loosen the screws, but you'll damage the rails.
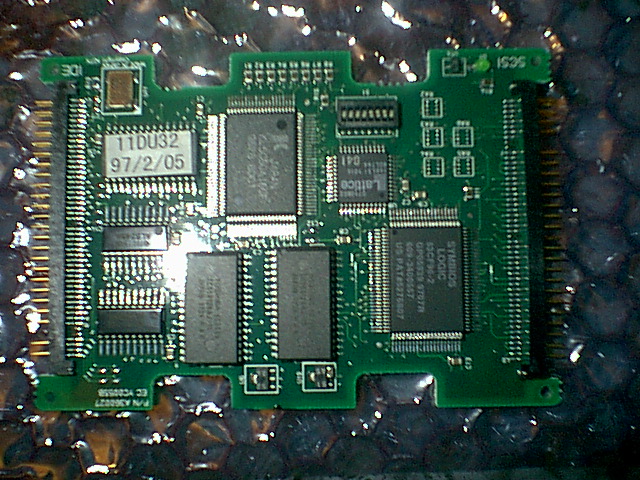
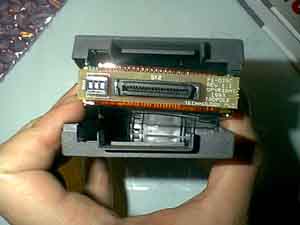
Here is an inside view of the ADTX IDE-SCSI interface card:
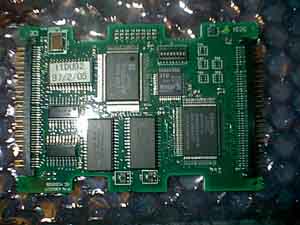
Next, remove the SCSI interface cable from the IDE-SCSI interface board. Be careful
as there is an IDE bridge (two IDE connectors with a bit of ribbon cable) holding
the IDE-SCSI interface card to the drive. You might wish to use a small flat
head screw driver to remove these cables.
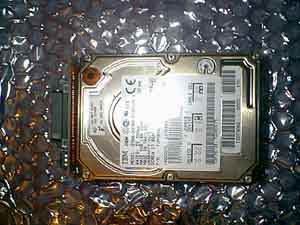
Now, carefully unscrew the original IBM 2Gb drive from the rails. They are
normal Phillips screws, so this will be easy.
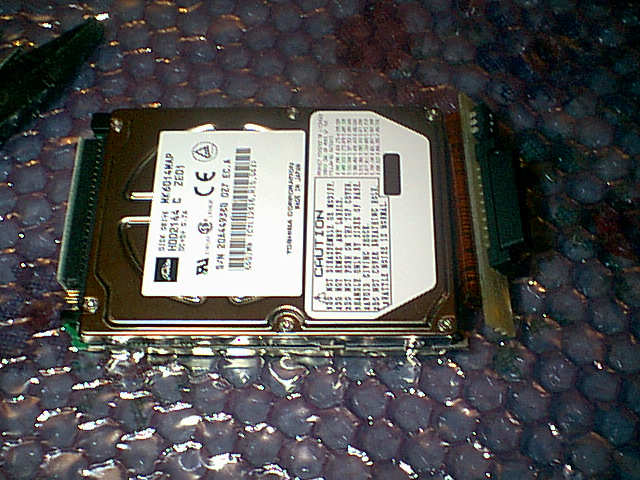
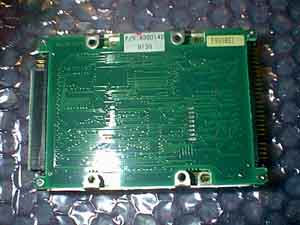
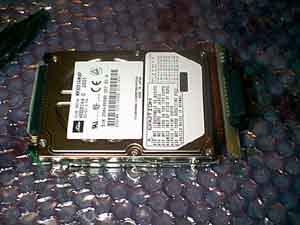
With my Toshiba 6.0Gb, drive I was able to reconstruct the drive with the IDE
to SCSI interface board, but the rails stuck out a bit too far for it to fit
back into the SPARCBook sled. So I didn't use the rails. Rather, I opted to
use several FOAM rubber feet (NOT SOLID RUBBER!). I also placed these
inside the four corners of the sled as you don't want anything pushing on the
top of the drive.
Note that once assembled the drive will go in upside down. This is normal.
Here is the reassembled drive:
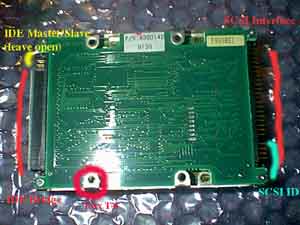
Now put the IDE bridge back on, and the SCSI cable. Make sure the IDE
selector on the drive and IDE-SCSI interface has nothing on it.
Now replace the SCSI interface cable making sure that the SCSI ID dip switches
are on the same side as the ID pins of the IDE-SCSI interface card.
Put the new drive back into the sled taking care to make sure that the SCSI ID
dip switches are in their proper place (otherwise you'll put the drive in
upside down.) The SCSI cable with the DIP switches will fit into the second
slot inside the case. If you put it into the first, the connector will stick
out too far.
Click to return to the top.
Copyright (C) 2000 by Ray Arachelian, All Rights Reserved .
Mirroring/Duplication of this web page and its related images is permitted so long they are not modified, or separated in any way.